Getting AI Insights
Dive into deeper understanding of your customer content using User Evaluation's AI insights. Here's how you can efficiently garner these insights from your uploaded files:
1. Start a New Project#
Begin by creating a new project. Once established, you'll be directed to the Overview page.
2. Set the Language#
- Located under the project name, you'll spot the Language option. Ensure you adjust this setting to match the language present in your audio or video assets.
- User Evaluation boasts support for 57 languages! Here is the full list of transcription langauges we support: English (variants: US, UK, AU, Global), Afrikaans, Arabic, Armenian, Azerbaijani, Belarusian, Bosnian, Bulgarian, Catalan, Chinese, Croatian, Czech, Danish, Dutch, Estonian, Finnish, French, Galician, German, Greek, Hebrew, Hindi, Hungarian, Icelandic, Indonesian, Italian, Japanese, Kannada, Kazakh, Korean, Latvian, Lithuanian, Macedonian, Malay, Marathi, Maori, Nepali, Norwegian, Persian, Polish, Portuguese, Romanian, Russian, Serbian, Slovak, Slovenian, Spanish, Swahili, Swedish, Tagalog, Tamil, Thai, Turkish, Ukrainian, Urdu, Vietnamese, and Welsh.
3. Adding Files for Transcription#
Click Add New on the Overview page.
A Drop Zone will appear. Either drag and drop your desired files onto this area or click within it to browse and select files from your device.
Alternatively, choose from previously uploaded files in the File Library provided by User Evaluation.
User Evaluation supports the following file formats: 3ga, 8svx, aac, ac3, aif, aiff, alac, amr, ape, au, dss, flac, flv, x-m4a, m4a, m4b, m4p, m4r, mp3, mpga, ogg, oga, mogg, opus, qcp, tta, voc, wav, wma, wv, webm, MTS, M2TS, TS, mov, mp2, mp4, m4v, mxf.
4. Processing Your Files#
- Once your files are uploaded, await a notification confirming the same.
- Click Add to Project. Your files will then begin the transcription process.
- The process requires a few minutes. Upon completing the processing, you'll receive an email notifying that your project is ready for review.
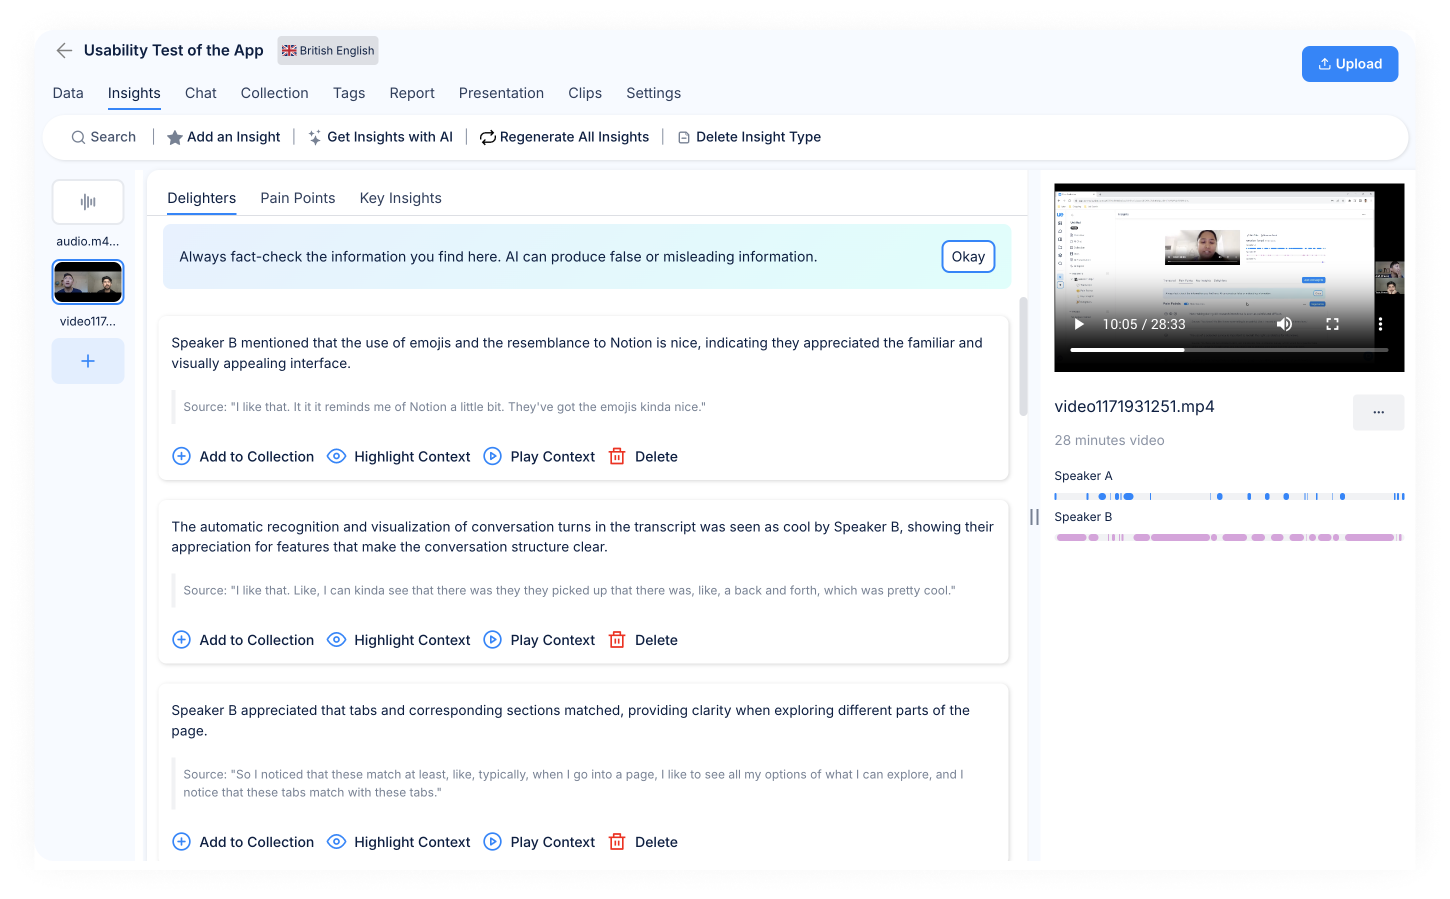
5. Exploring AI Insights#
When you re-enter your project:
Key Insights: These represent primary takeaways that our AI believes are crucial for you to review.
Pain Points: Understand challenges or problems detected during your user interactions.
Delighters: Discover aspects that resonated positively with your users.
6. Navigating the Insights#
Sources: By default, all insights will display their sources. To streamline your review, you can opt to hide these sources, presenting a concise list of insights.
Modify and Regenerate: If you've altered speaker labels and want them reflected in insights, hit regenerate. The system will then factor in these label changes.
7. Interacting with Insights#
Collecting Insights: To save an insight to Collection, click the '+' icon adjacent to it
Highlighting Sources: To hightlight its context within your transcript or content, utilize the 'eye' icon or the 'highlight context' feature. For audio and video content, an accompanying Play button lets you listen or view the original source directly.
Note: At times, exact matches might be absent due to User Evaluation's discretion to tweak the source for clarity, ensuring it remains rooted in your actual data.
8. Expanding AI Insights#
- Click on Add AI Insights to encounter an array of templates to further enhance your analysis. Templates range from identifying 'Opportunity Areas' and 'Opposing Views' to extracting precise 'Quotes' and formulating 'Questions for the Next Session'.
Unlock the power of artificial intelligence with User Evaluation and transform raw data into actionable insights. Navigate your content's depths and reap the benefits of a well-informed perspective!